

In video content creation’s competitive and dynamic world, mastering the technique of text editing in advanced video editing tools such as Adobe Premiere Pro can significantly help individuals set their work apart from the rest. Whether you work as a content creator, digital marketer, or even a full-fledged filmmaker, the skill to smoothly add as well as edit text in videos plays a very important role in the grand scale of things.
For starters, it enhances the video’s visual appeal. Besides this, it also helps in conveying the desired message in a more effective manner, thereby making your video footage more engaging and professional-looking. Adobe’s comprehensive video editing program Premiere Pro tool provides numerous potent and versatile editing features and tools for editing text. Using them can elevate the appeal of your videos to the next level.
Right from creating compelling video title clips and informative subtitles and captions to crafting impactful lower thirds as well as polished credits, learning how to use the said features can seriously improve your videos’ storytelling and accessibility. Learning all about editing text using Premiere Pro will also empower you to create more dynamic & visually stunning content powered by video effects, thereby ensuring your desired message resonates more with the target audience.
In this article, we will cover some of the most effective ways users can edit text in Adobe Premiere Pro and stand out in a heavily crowded digital landscape. Let us begin:
Effective Ways to Edit Text in Adobe Premiere Pro
Here is a detailed look at four important ways Premiere Pro users can do text-based editing in their videos and make them look more professional and appealing:
Creating & Editing Text Using the Essential Graphics Panel
The “Essential Graphics” panel is deemed the main tool for the creation as well as customization of text within Premiere Pro by millions of users. Here are the steps to create and edit text using the Essential Graphics panel:
Step 1: Open the panel by navigating to Window > Essential Graphics.
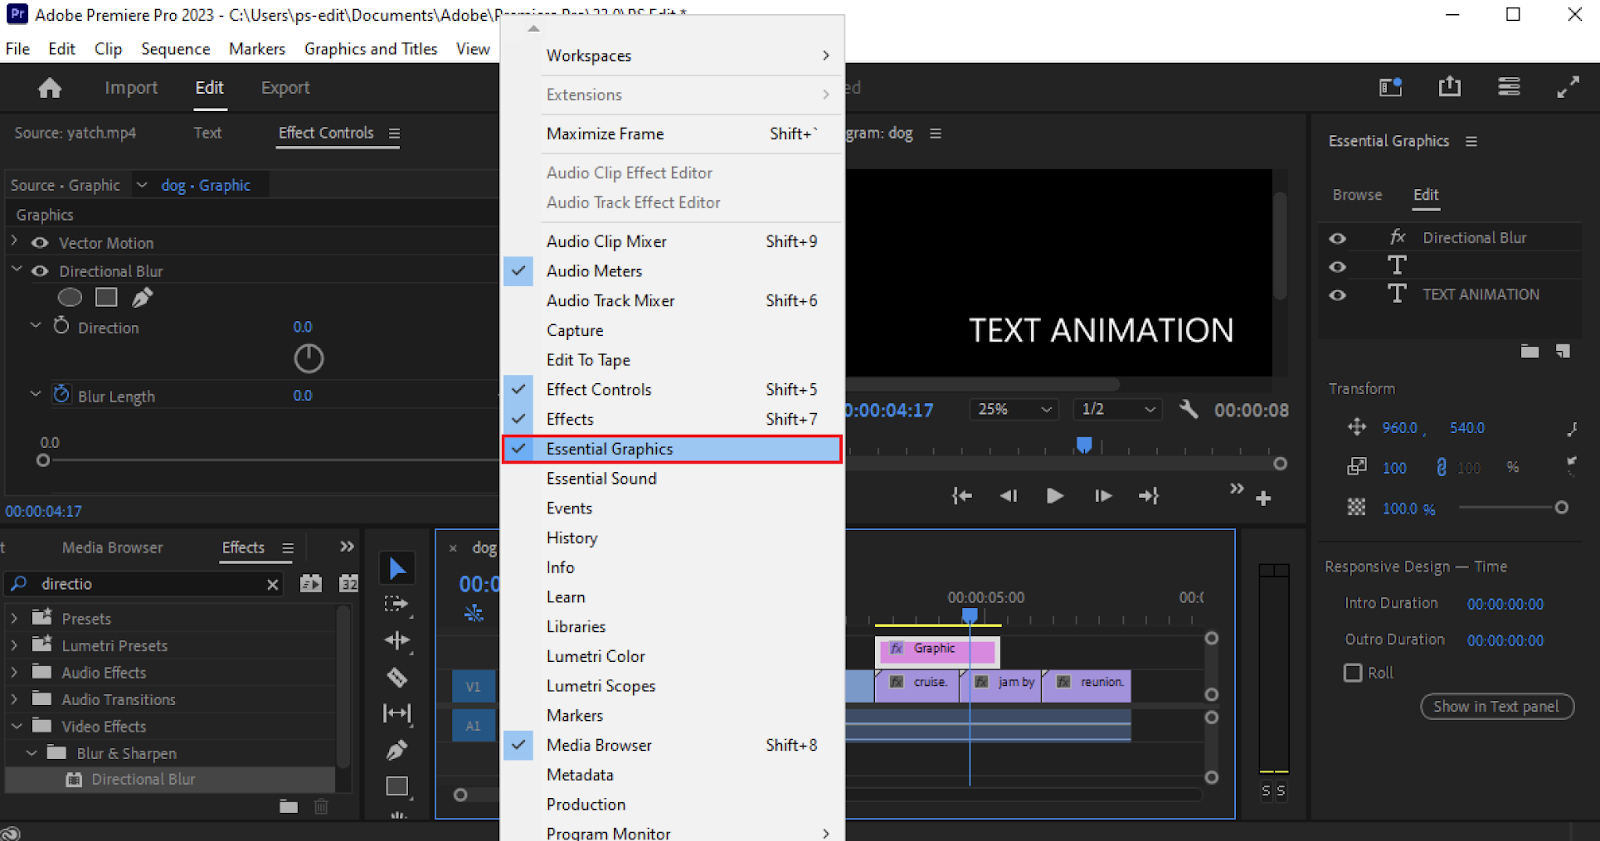
Step 2: Click on the “Type” option present in the Toolbar or simply press the “T” key.
Step 3: To make a new layer of text, click anywhere in the Program Monitor panel and begin typing in the desired text.
Step 4: Select the layer of text you wish to edit, and then use the panel to make changes, i.e., changes in the font, size and color, alignment, etc. Besides this, you can also try stylizing it with shadows, fills, strokes, etc.
Advanced text customizations using the panel include:
- Keyframing the Text Properties: You can animate the properties of the text such as the position, opacity, and size by setting the keyframes in the Effect Controls panel. More about this below.
- Using Different Templates: Adobe Premiere Pro provides an extensive range of text templates. You can access and use them directly from the panel of Essential Graphics and customize them as per your project’s requirements. Some popular text templates include Futuristic Cyberpunk Title, Professional Minimalistic Corporate Overlay, Lower Thirds, etc.
Creating & Editing Text Using Legacy Title
Although the aforementioned Graphics Panel is considered the primary tool for editing text, Premiere Pro retains the “Legacy Title” tool, especially for those users who prefer its interface. Here are the steps to create and edit text using the Legacy Title tool.
Step 1: Open the Legacy Title tool by navigating to File > New > Legacy Title.
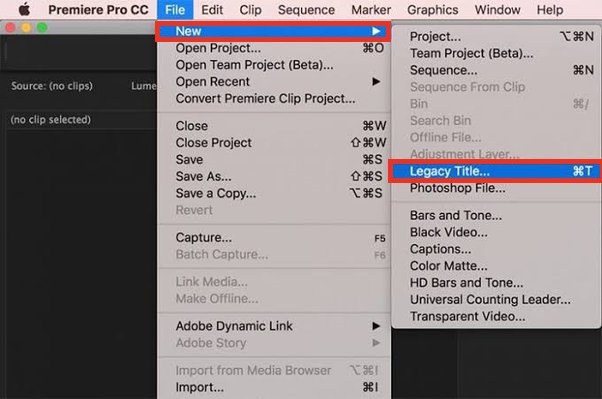
Step 2: Utilize the tools present within the Legacy Title tool’s window to add and format the desired text.
Step 3: Make adjustments to properties such as the font, font size, and font color, and apply the preferred style from the extensive range of styles available.
Besides featuring a user-friendly interface, the Legacy title tool may be useful for projects that need a certain look which users may have already created in a previous version of the editing application.
Important Note: As of Premiere Pro’s version 23.0, the Legacy Title is no longer included in the tool. Users who wish to access the utility will need to revert to older versions of the editing software.
Animating Text Using Effects Control Panel
In addition to featuring the Essential Graphics panel and the Legacy Title tool, Premiere Pro also offers users the option to animate text and give it some movement. Let us take a look at the steps to animate text using effects:
Step 1: The first step is selecting the text layer. In the timeline, select the layer which you wish to animate by clicking on it.
Step 2: Navigate to Window > Effects Controls.
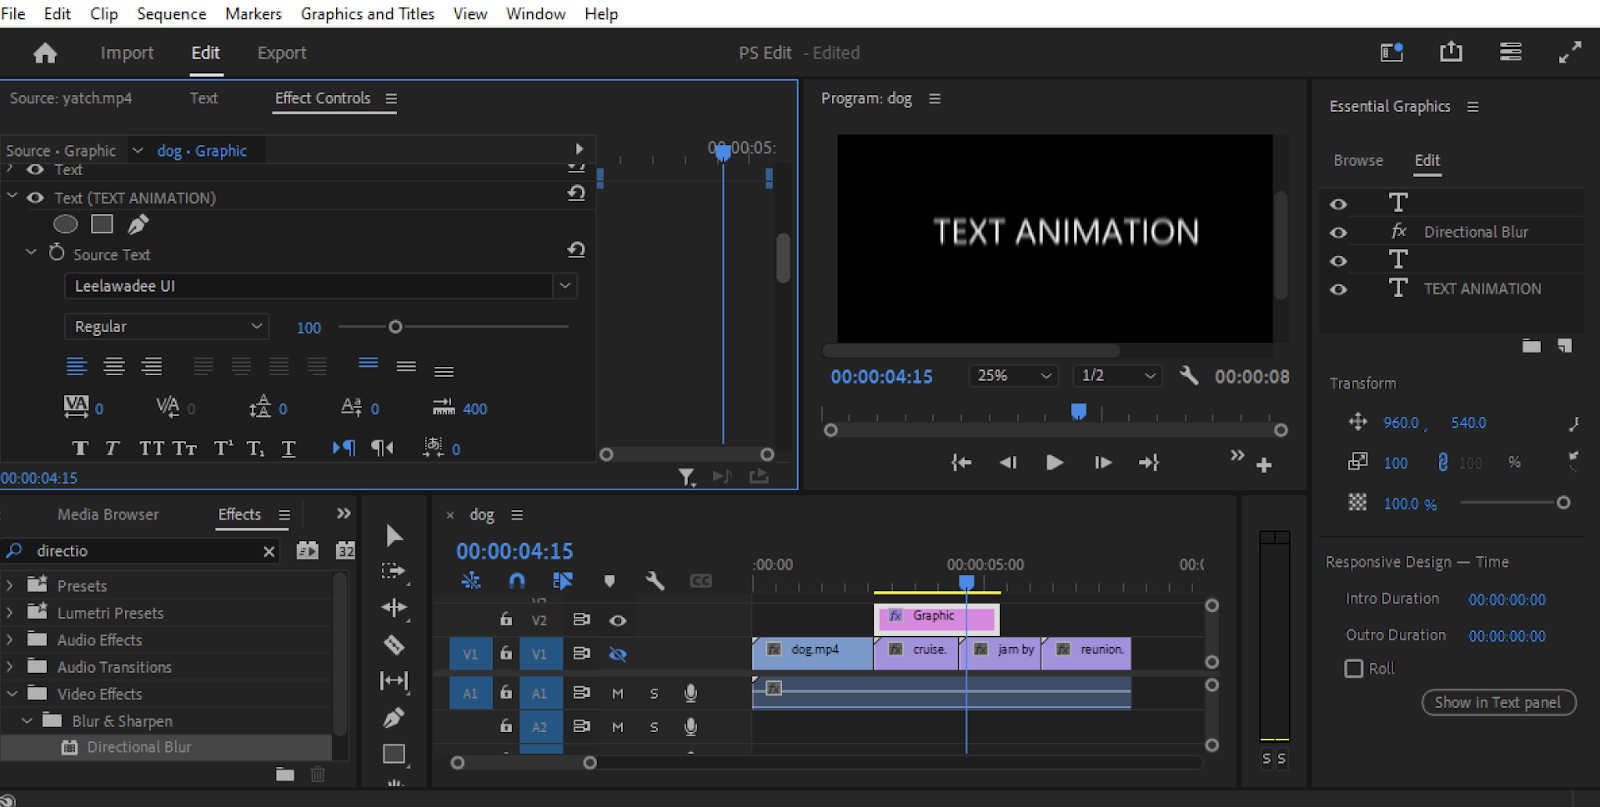
Step 3: You can animate the position, the opacity, size, anything. Let’s say you’re animating the position and you want to move the text from left to right. Drag the position’s value to move your text to wherever you want the animation to start.
Step 4: Next, click on the stopwatch icon beside the specific property you wish to animate to create a starting keyframe.

Step 5: Move the time marker to where you want the text animation to finish.
Step 6: Drag the position value to where you want the text to move to by the end of the animation. Doing so will create a second keyframe at the time marker’s location.
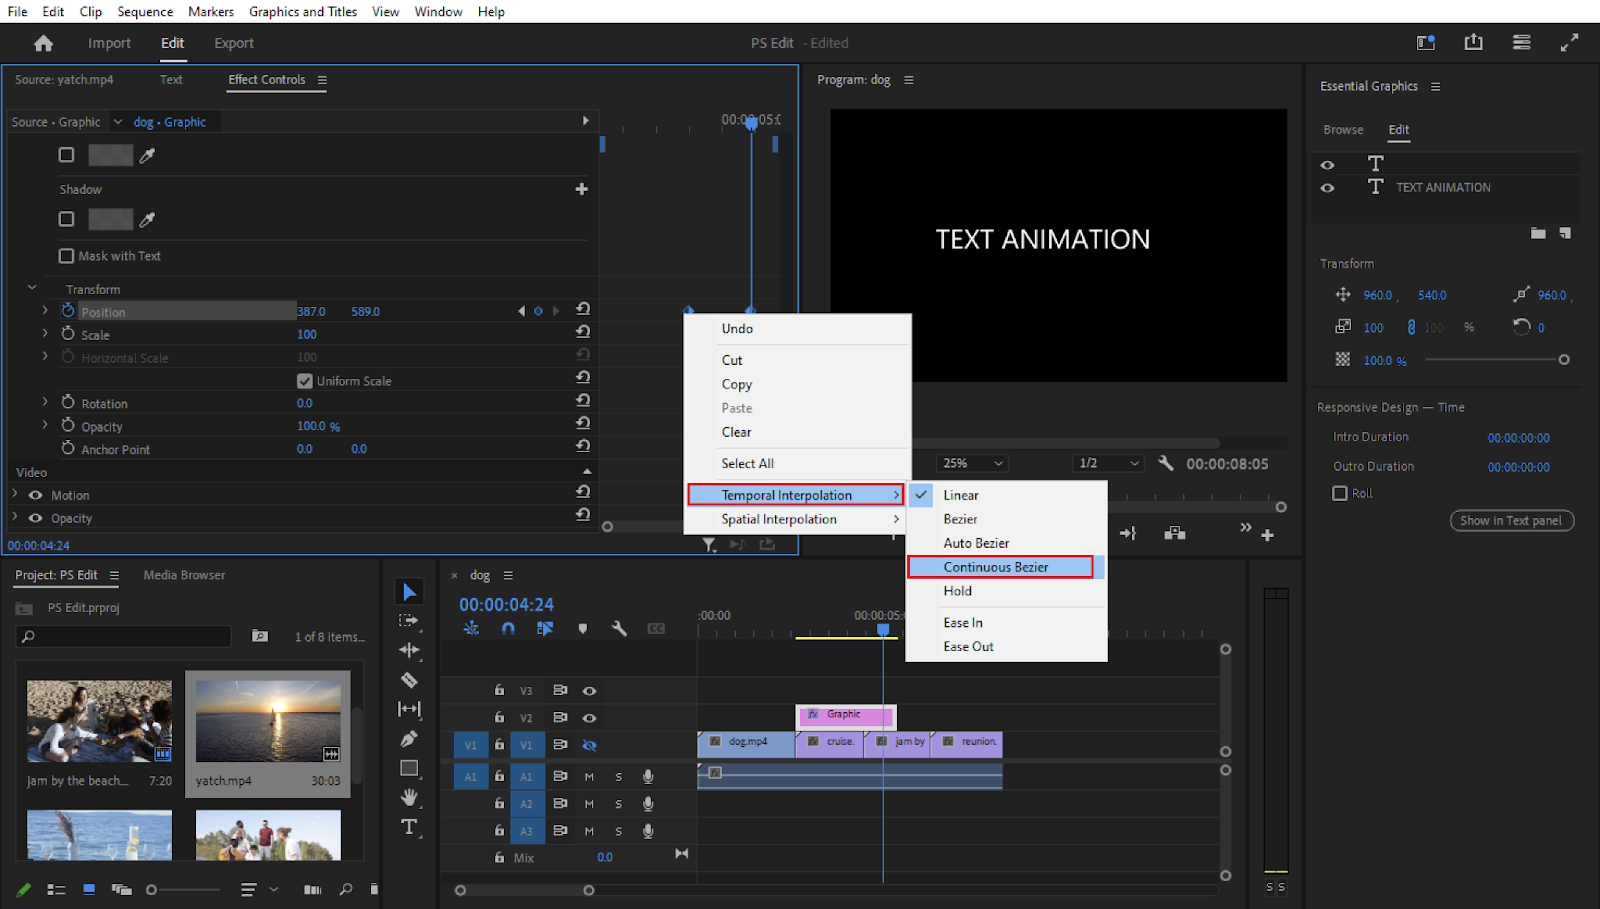
Step 7: You can also go the extra mile and smoothen the basic animation or cinematic animation by right-clicking the keyframe and going to Temporal Interpolation > Continuous Bezier. You then adjust the speed ramps of the bezier to produce a seamless animation.
This can be done for opacity, rotation, scale, and even some other Premiere Pro effects found under the Effects menu of the Program Monitor. Directional blur, transform, cross dissolve, etc. are a few available effects that amplify the overall appeal of the video.
Besides the aforementioned ones, there are a variety of other text animations users can choose from in the “Effects” panel, including the likes of Fade In/Out, VR Glitch, Drop Shadow, etc.
How to Download, Import, and Apply Text Animation Presets in Premiere Pro
Presets are predefined configurations that can be applied to various aspects of the editing process to achieve a certain style. Websites like Motion Array, Mixkit, Envato Elements, etc. offer preset packs to users (some free, some paid) so they can achieve a desired style at much faster speeds. Here’s how users can animate text in Premiere Pro using presets:
Step 1: Navigate to the site that offers the epic animation preset you want and download it
Step 3: Choose the location where you wish to save the downloaded file and click on the “Save” button.
Step 4: After the download is complete, extract the downloaded folder to the desired location on your system.
Step 5: Open Premiere Pro, navigate to the Effects panel, click on the hamburger menu to open the drop-down menu and select the option “Import Presets”.
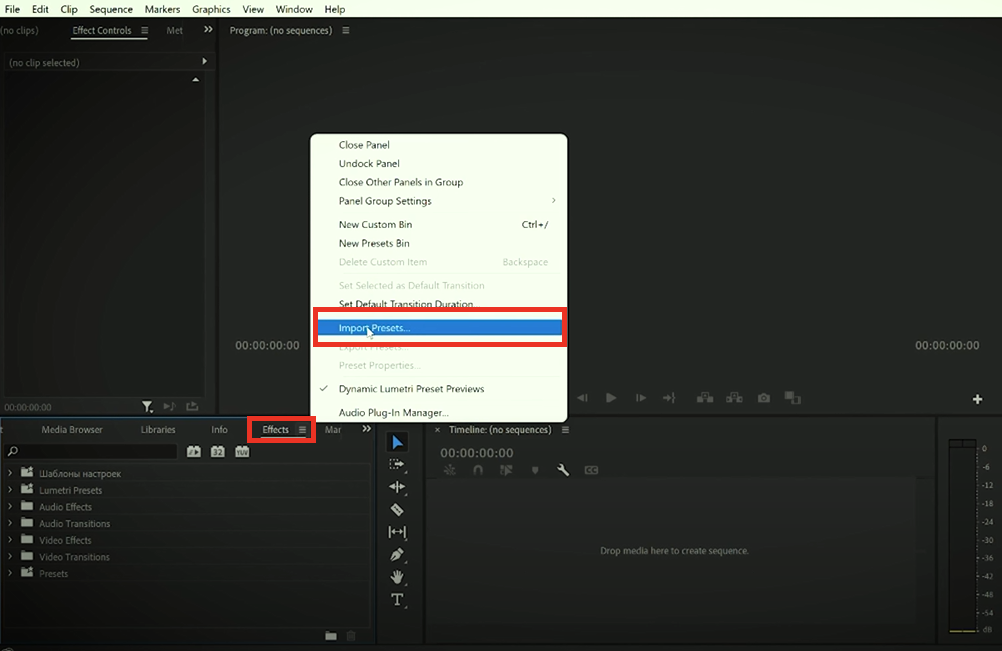
Step 6: Open the folder where the downloaded file was extracted and click on the “Premiere Pro” folder.
Step 7: Open the PRFPSET (preset) file. Doing so will import the preset to Premiere Pro.
Step 8: After the preset has been imported, open Premiere Pro and add the desired text to the project.
Step 9: Under the “Project: Preset” in the Project Panel, find the imported preset file of the high-quality animation and open it.
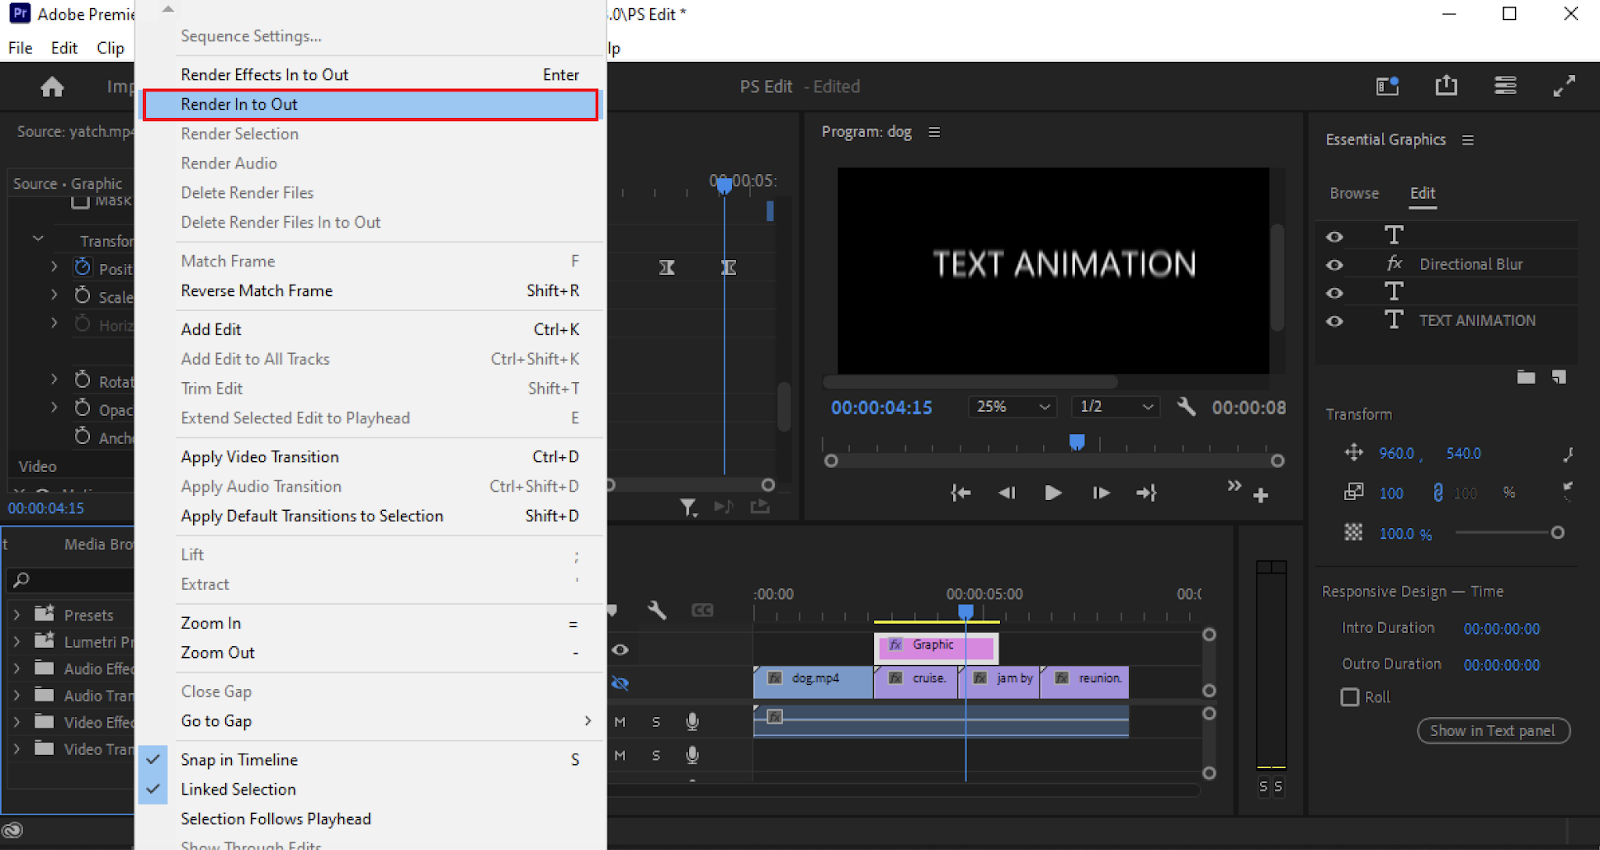
Step 10: Drag the desired variant of the preset onto the text, highlight the project by navigating to the Sequence menu and clicking the “Render In to Out” option. Doing so will apply the changes which you can see in the Program Monitor.
Adding & Editing Captions
Besides adding to the essence of the videos, captions are very important for accessibility. Captions can easily be added as well as edited in Adobe Premiere Pro. Here are the steps which need to be followed by users to edit captions:
Step 1: Navigate to File > New > Captions.
Step 2: Select the suitable format of captions, i.e., choose between Open Captions, Closed Captions, etc.
Step 3: Go to the Captions panel and input the desired text. Then, adjust the timing by dragging the caption block’s edge in the timeline.
Step 4: Utilize the “Essential Graphics” panel to customize the captions similar to how you would customize or style any other type of text.
Final Thoughts
Editing text in Adobe’s powerful video editing software is a highly versatile process with a wide range of tools and techniques to fit your requirements. Whether you are leveraging the commonly-used Essential Graphics panel to create modern and flexible text, the popular Legacy Tool title for having a classic workflow, animating text to obtain dynamic visuals, or including captions for easy accessibility, Premiere Pro offers powerful capabilities to help you make your video’s text stand out.
By mastering these text-editing techniques, you will be properly equipped to amplify the appeal of your video clips and projects with exceptional-quality text. For those individuals who are on the lookout to expand their expertise in the world of video footage editing even further, platforms like Postudio feature excellent collaborative tools that can be used to bring even the most complicated video projects to life.
Postudio offers you the option to connect, create, & edit videos virtually with ease. The best part is that the platform does not have any hardware or software requirements, i.e., users can work on their video from anywhere without worrying about their system’s hardware or software capabilities. All one would need is an internet connection and a browser. Leveraging such platforms can aid you in being at the forefront of video editing technology. To get started, click here.


")

