

Contents
- Best Premiere Pro Export Settings for YouTube
- Best Premiere Pro Export Settings for Instagram
- Best Premiere Pro Export Settings for TikTok
- Best Premiere Pro Export Settings for Facebook
- Best Premiere Pro Export Settings for Vimeo
- 4K Export Settings for Adobe Premiere Pro
- Best Audio Export Settings for Premiere Pro
- Conclusion
Creating good videos is only part of the battle. To make sure your content appears its best on popular platforms such as YouTube, Instagram, TikTok, etc., you must export every one of your videos with the correct settings. Adobe Premiere Pro provides numerous powerful tools and settings to aid with this.
Knowing the best export settings of every platform can significantly enhance your videos’ quality, reach, as well as engagement. Below, we have listed the best export settings for multiple platforms, including YouTube, Instagram, Tiktok, Facebook, and Vimeo. Let us dive right into it:
Best Premiere Pro Export Settings for YouTube
To ensure their video looks and performs optimally on YouTube, content creators must adhere to specific video and audio requirements. Moreover, they should also use the correct export settings to maintain the quality of videos, minimize export times, and most importantly, maintain compatibility with the platform’s playback system. Here is a detailed look at the right video and audio export settings:
Video Export Settings for YouTube
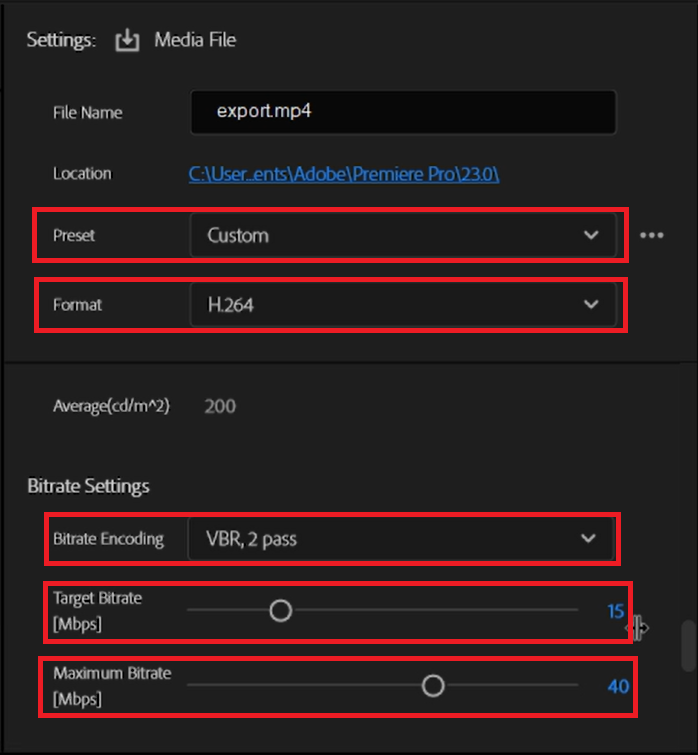
- Format: H.264
- Standard Preset: Custom (Important Tip: Make sure to tick both the audio) and video checkboxes.
- Frame Rate: 23.976
- Height & Width: 1080×1920
- Bitrate Encoding: VBR, 2 Pass
- Target Bitrate: 15
- Maximum Bitrate: 40
Important Tip: Check the box option that says “Use Maximum Render Quality.”
Audio Export Settings for YouTube
Navigate to the Export Settings Tab and make the following changes to the specifications:
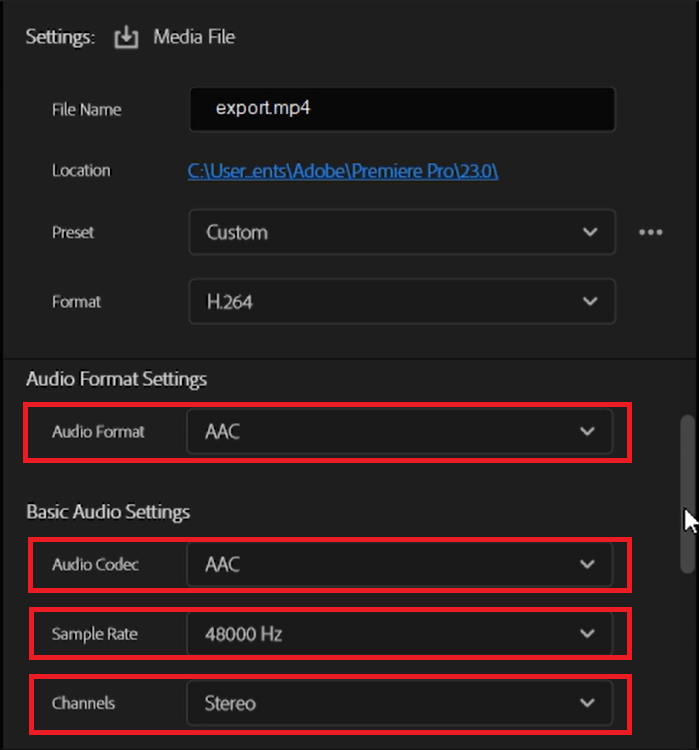
- Audio Codec: AAC
- Audio Format: AAC
- Sample Rate: 48000 Hz
- Audio Quality: High
- Channels: Stereo
Make the following changes in Bitrate Settings:
- Bitrate: 320
- Advanced Settings > Precedence: Bitrate.
After making the aforementioned changes, your YouTube Video is now ready to export from Premiere Pro. Click on Export, then upload your masterpiece on your YouTube channel, and wait for the likes, comments, and subscriptions to flood in!
Best Premiere Pro Export Settings for Instagram
Instagram’s evolution from a photo-centric social media site to a platform that deviates more towards video content has been a significant transition. To make sure that their videos, whether it is an Instagram reel or an IGTV video, perform exceptionally in terms of engagement and reach, creators must meet the top-tier social media platform’s video as well as image quality besides compatibility requirements. One way to achieve this is to follow the right video and audio export settings, both of which are listed below:
Video Export Settings for Instagram
Navigate to the Export Settings Tab and make the given changes:
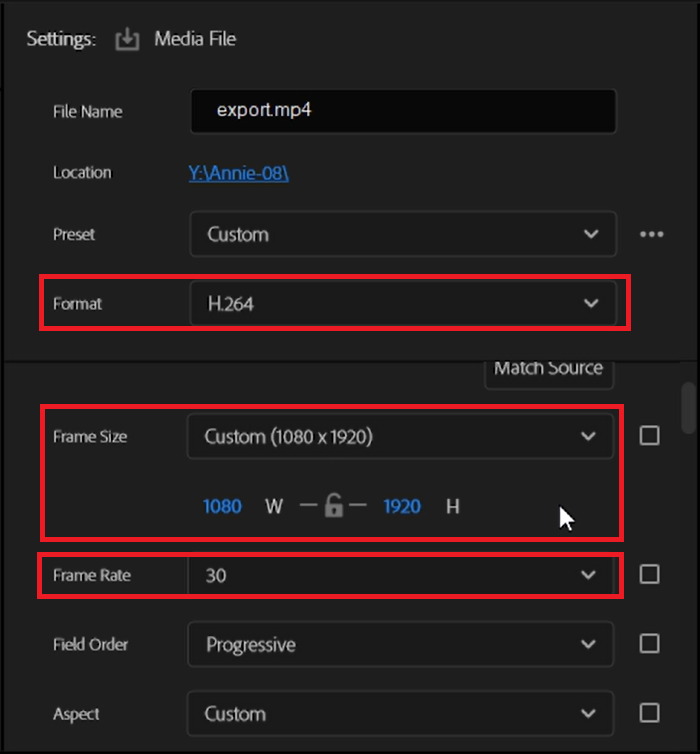
- Frame Rate: 30
- Frame Size: 1080×1920.
- Video Format: H.264
- Match Source: High Bitrate.
- Render: Maximum Depth and Maximum Render Quality.
- Bitrate Encoding: VBR, 2Pass
- Target Bitrate: 2 MBPS
- Maximum Bitrate: 3 MBPS
Important Tip – Once all the settings have been adjusted, it would be best to save them as an export preset. Doing so will save you from the hassle of manually configuring the settings whenever you wish to export to Instagram.
Audio Export Settings for Instagram
To acquire the best audio export settings for Instagram, make the following changes:
- Audio Format: AAC
- Sample Rate: 48,000 Hz
- Bitrate: 128 KBPS
- Channel: Stereo
- Codec: AAC
Best Premiere Pro Export Settings for TikTok
TikTok is deemed the most popular social networking site, and a prominent reason behind it is the platform’s unique short-form format. For creators using the platform to upload and showcase their content, one of the most important parts is exporting their content piece after selecting the right export settings. If you are a TikTok creator, here are the best video and audio-related current export settings that you can use to ensure your video’s success:
Video Export Settings for TikTok
Make the following changes to settings after navigating to the Export Settings dialog box or section:
- Format: H.264.
- Frame Size: 1080×1920. (Important Tip – Check the box labeled “Maximum Depth” in the Render settings option.)
- Bitrate Encoding: CBR
Important Tip – Ensure that the Use Maximum Render Quality checkbox is ticked.
Audio Export Settings for TikTok
- Audio Format: AAC
Check and confirm the default settings and then move on to rendering.
Important Tip – Save the aforementioned settings as your default export settings, since doing so will save you from the hassle of making adjustments any time you wish to upload a video.
Best Premiere Pro Export Settings for Facebook
With more than 2.9 billion users globally, Facebook features different varieties of content, out of which videos are the undisputed champions and the primary source of content for a plethora of users, i.e., they perform better than all other forms of content. Hence, there are a plethora of creators who upload videos as their primary form of content. Most users consume content on their smartphones, which is why it is crucial for creators to optimize their videos for small screens.
Similar to other social media sites mentioned above, video creators who wish to post video content on Facebook must ensure that their videos are optimized for the platform. To do so, they simply need to use the given Premiere Pro export settings:
- Video Resolution: 1080×1920
- Video Codec: H.264
- Export Format: As MP4 Files
- Target Bitrate: 15 MB/s
- Bitrate Encoding: VBR, 1 pass.
Important Tip – Besides exporting videos as MP4 videos, keep the compression rate below 4 MB.
Best Premiere Pro Export Settings for Vimeo
Vimeo is another exceptional online platform that is popular for delivering high-definition videos from creators to a global audience. To guarantee that their videos perform well on Vimeo, creators must make them compatible with the platform’s standards by using the right export settings. Here is a glance at the recommended export settings that Premiere Pro editors can use to get the job done:
Video Export Settings for Vimeo
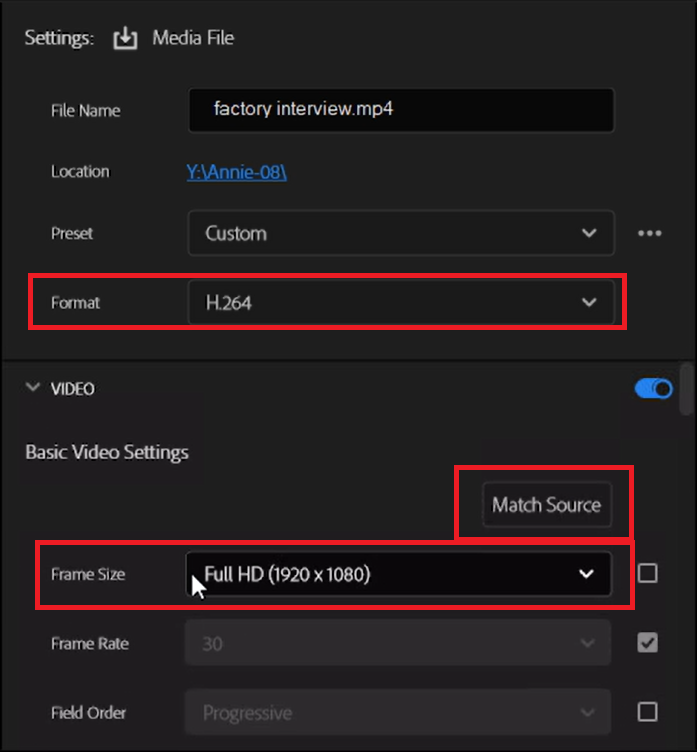
- Match Source: Unchecked
- Format: H.264
- Frame Size: Full HD (1920 x 1080)
- Output Name: Video Output Name and Destination
- Bitrate Encoding: VBR, 2 Pass
Important Tip – Render at Maximum Depth.
Audio Export Settings for Vimeo
- Audio Format: AAC
- Audio Quality: High
- Channel: Stereo
- Sample Rate: 48,000 Hz
- Actions for Checkboxes:
- Use Maximum Render Quality: Checked
- Use Frame Blending: Unchecked
- Use Previews: Unchecked
- Import into Projects: Unchecked
4K Export Settings for Adobe Premiere Pro
The 4K Resolution, also known as UHD or Ultra High Definition, is one of the highest available resolutions which has become very popular amongst the masses. Thanks to its top-notch features like better clarity and sharpness, enhanced color, larger screen support, etc., video editors also love working with 4K videos.
To export 4K file types in Adobe Premiere Pro CC, users need to configure the settings in a specific way. Here is a look at the right settings to export 4K files on Adobe’s advanced editing software:
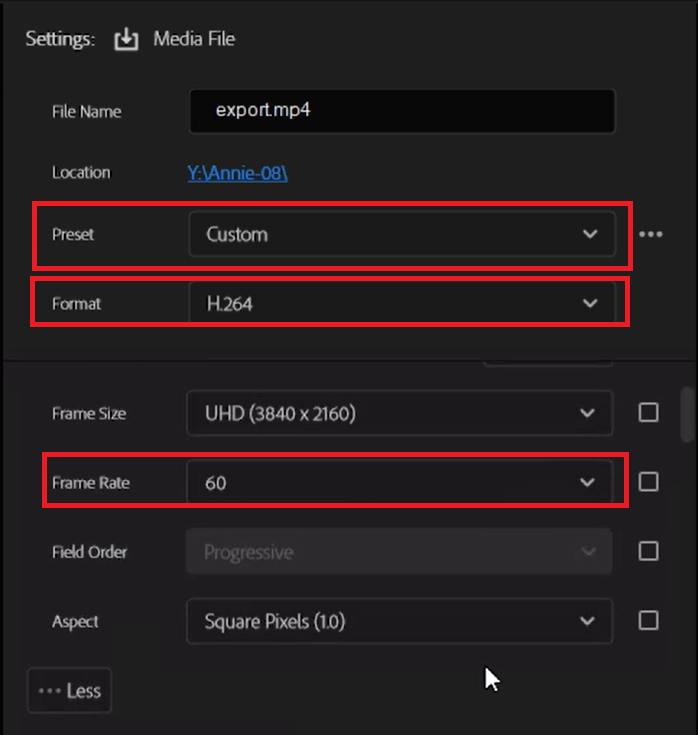
After opening the Export settings, select the following export options:
- Format: H.264
- Preset: Custom
- Check Match Sequence
- Select Use Maximum Render Quality
- Frame Rate: 60
- Bit Rate: 66-85 MB/s
- Audio Bitrate: 512 KB/s
Once the user has made the aforementioned changes in the settings, all they need to do is click on the “Export” button. Doing so will start the rendering process in 4K quality.
Best Audio Export Settings for Premiere Pro
Video is currently the most potent multimedia format. However, the majority of videos without audio are incomplete. Hence, besides using the right export settings for videos, it is essential for users to use the recommended audio settings. Doing so will ensure that the final edited video, besides having stellar visual quality, also features exceptional sound quality. Here are Adobe’s settings recommendations for achieving brilliant sound quality in videos:
- Audio Format: AAC
- Audio Codec: AAC
- Sample Rate: 48000 Hz
- Channel: Stereo
- Audio Quality: High
- Bitrate: 320 KB/s
- Precedence: Bitrate
- Select the Maximum Render Quality Option
Conclusion
Having the right export settings on Adobe Premiere Pro is important for creators who do not want to compromise on quality, whatever platform it may be. The best part is that the process of exporting videos on Premiere Pro is not very complicated. However, the time taken by the software to complete the exporting process depends on the hardware capabilities of the user’s system.
In simpler words, the rendering time is less for systems featuring top-end, expensive hardware, and more for systems with low-end chips and GPUs. Fortunately, there is a way to solve the issue without burning a hole in your pocket – using Postudio, a pro-level online creative studio. Postudio offers a wide range of the best video editing software (including Premiere Pro) completely online. It’s a platform where you can request your cloud system with hardware, software, and plugins of your choice, on-demand.
With the help of Postudio, you can conveniently perform post-production tasks from anywhere at any time, on hardware that you require for the task at hand, thereby eliminating the hassle of worrying about system compatibilities, hardware upgrades, etc. You can simplify the editing process, render, and export your videos with the settings you deem fit, and you’d be doing it on any basic laptop from anywhere at a fraction of the cost. The only criteria to use Postudio and get hold of finished projects is an internet connection and a browser. So, what are you waiting for? Become a part of the Postudio community and start creating!


")

